
The Paras push on to capture their last objective, the town of Breville itself, and close out the campaign...
The Germans have one last chance to salvage a small amount of pride, before the end... And this time their Commanding Officer has been given a rapid schooling in the art of holding ground with Infantry...
Having won the last battle and the dice off for the next game to choose the mission, Paul has pushed me back to Breville, and has decided on a Fighting Withdrawal to try and seal the fate of the Germans. Paul set the board up and I came along with 1750pts of Grenadiers, against Paul's British paras...
 |
| The German Force |
Pauls forces, IIRC...
British Airborne
HQ: CO + 2iC + 2x PIAT
Full Paras platoon
Full Paras platoon
Full Paras platoon
Para Engineers platoon
Commando Section
2 x 6pdrs
3 x DD Shermans + 1x Firefly (Confident Trained)
4 x Mortars
With insufficient buildings to create the right look, Paul instead took a different approach to setting up the town, and went for a full ruined town edge look, using the 'Stalingrad' building set he made!
Paul managed to bring these two sides of the boards into alignment raising one section on a slightly raised platform. Very clever I thought!
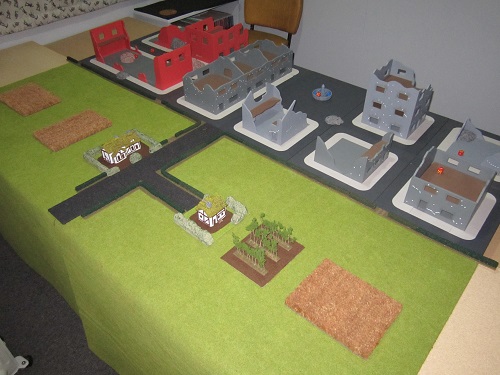 |
| The outskirts of Breville |
The pioneers covered my exposed right side of the board, behind their barbed wire, and backed up by 2 infantry guns and 2 HMGs. In the centre a grenadier platoon with attached HMG and P'schrek team, and backed up by my scouts with assault rifles. On my left another Grenadier platoon with attached HMG, backed up by 3 Pak38s. My 2 mortars were centre back holding centre objective . The 5 PzIVs were in ambush...
 |
| Pioneers defend the German right flank |
Paul decided to mass his main attack on his right, not wanting to have to deal with my wire... which was more or less as I expected. So I added my 2ic and CO to the end flank building.
 |
| Paras, commandos and Shermans backed by mortars ready their assault under cover of darkness |
 |
| Looking down the German line from their left flank |
Paul pulled night attack and with it the British spearhead move. My high line of defence did impede this move, slightly. Undaunted Paul pressed on with his attack getting into it quickly with Commandos and Paras, looking to make some holes with flamethrowers...
The panzers reveal their ambush from behind the left flank end buildings and drive up ready to hose the attacking infantry...
 |
| Initial attack, 2 flamethrowers are expended for the loss of a single German team |
The bold move by the commandos flamethrower is rewarded by a hail of return fire which guts the commandos and they break and flee. Still undaunted Paul readies his assault with careful precision and manages to breach my line...
 |
| Paul gets excited with the casualty markers... there weren't quite that many deaths here , yet... |
Its all on like donkey kong! I have lost the end grenadiers, 2iC and a panzer to Paul's assaults, but my Co has fallen back out of harms way. All this time my scouts have been rushing across from the centre, as have the 2 HMGs from the opposite flank, trying to help reinforce my faltering left... But Paul still has the pak38s and panzers to deal with...
 |
| Its all on big time! |
A surge by Brits, and everything fires trying to knock out the pak38s and panzers to little effect! But the assault still goes in capturing the end flank building and forcing me to pull back the guns and tanks slightly....
 |
| Paras capture the end building, but objective is still strongly contested. |
Now comes the craziness, with nothing to lose, a real do or die, Paul emerges from the building, and with a combination of fire, destroys a Pak38, bails a panzer with a Piat, and assaults the remaining panzers, staring down 12 dice of def fire on 4s. I push him back just... 3 dice are 4s, 2 are cocked, I roll these again, one 4 the other cocked again... I can't bare the tension! I roll the last dice again, a 4! And he is pushed back!
Paul then throws caution to the wind and has the 2iC join the 2 remaining Piats from a gutted para platoon and assaults with these! 12 def fire dice again... I pick my dice back up counting as I do and suddenly realise I had thrown 13 dice previously! What to to do? Paul resets his main para platoon again , "thrown em again Scott!" Eek! I do but get 5+ definite hits pinning back the main thrust. So Paul still tries with the 2 Piats. 12 dice again and again they are thrown back. But Paul's is rolling saves like a god again and few if any of the paras fall to the def fire.
Day light had also broken at start of turn 3...
In my turn I think, right, hose the lot of them down and that will be the end of it. I fire everything that I can. But Paul keeps rolling so many saves. Only the engineers are finally stopped , reduced to three teams and the Pltn Cmd dead, they cannot advance. But the main paras still pressuring my panzers refused to die.
To make matters worse the Shermans remount and let my Panzers have it! Paul lines up everything shooting all he can to get pins and or destroy teams in the crucial area. He's done all he can and assaults once more.
Defensive fire from the remaining Pak, Scouts, CO and lone observer spit out just enough fire to throw back Pauls assault.
 |
| Paul gets ready for his crazy assaults! |
Its now almost midnight, we've played for over 4 hours and although contesting the flank objective, I am now in a position after some 5 turns to be able to pull this flank objective out from under Paul. Even if he does get it next turn, it will then vaporise and he will be in no position really to push for the other objectives in any sensible time frame, and I have enough platoons remaining such that he is unlikely to break me, and I still have my CO alive, for a change!
So Pauls calls it. The Germans have held on for their first win of the campaign, and as they started with 9 platoons and only lost two (Grenadiers and Panzers), claim a 5-2 win.
 |
| Final positions |
He may be wishing he hadn't told me now???
So I claw back some VPs for the campaign and post game dice rolls show Paul still has the initiative to try and attack again. He chooses to try Surrounded for the next game...
This was the most fun game of the campaign so far, despite being on the losing side. The outcome was uncertain right until the last turn, and there were lots of "knife-edge" dice rolls and ballsy moves(and nervous farts from a certain German player!)
ReplyDeleteI did throw away my Commandos somewhat with a rush of blood to the head, but came desperately close to stealing it. One more hit on your Scouts would have pinned them and cut you defensive fire in half, then I would have had a good chance of pushing you off the objective in my Turn 5. Still, it wasn't to be, your defence was very robust this time around. You must have had a good teacher ;-)
One minor correction, I was playing an Airlanding Company, not a Parachute Company. Those light mortars make all the difference you know!
Great to see you have your blog comment mojo back! I assume technical difficulties have been overcome?
DeleteI set the blog to only display one post so it will hopefully load faster too...
Yes the best game of the series, so many close calls and it kept it interesting all the way through to the end.
I must apologise for the unintentional use of gas weapons, I realise the friendly folk in Geneva may take a dim view of this practice ;-)
Yes my teacher is certainly an infantry pro!
Ah I see, 'fraid I'm not an expert on those British chaps that throw themsleves out of perfectly good aeroplanes... if you wish in future, ping me an email with your armylist from EasyArmy and I can add it to the report, having discovered the 'snipping tool'