In the last game, Paul and his Paras had attacked Breville, but the German defending force had been successful in performing a Fighting Withdrawal...
So although a 'win' for the Germans, the Paras still have the initiative, and press on with their attack, surrounding the town of Breville now. And thus the next logical battle to try is 'Surrounded' - Can the German defenders maintain a corridor to freedom and escape, or for resupply, to maintain their foothold on the town...
The scene is set...
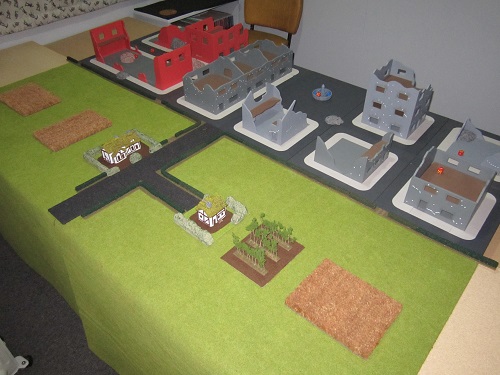
Having read the terrain description, from the briefing, the town of Breville lies at the north end of the Bravent Ridge, located roughly NE of Caen... So I decided to run a long low ridge-like hill from one side of board to the centre, placed a crossroads there, and built the town around it.
The forces for this battle as follows...
German Defenders, Grenadierkompanie from Fortress Europe 1750pts.

I had tweaked the army list from last time... As much as I liked fielding the 5 PzIVs, which gives me a lot of mobile MG for killing infantry, they are still prone to Shermans, Fireflies and even PIATs. So I decided to drop them in favour of a pair of Tigers. It would mean less MG fire for infantry killing but hopefully more survivability, and enough firepower to deal with the enemy Shermans.
The mortars were brought back up to 4 tubes (from 2 last time), hopefully for a bit more strength, whether bombardment or direct fire for effect, or smoke. The Pak38s were trimmed back from three guns to two.
Paul, brought the same list, I believe, as he tried last time...
Airlanding Company from Turning Tide, 1750pts, I believe something like:

The forces are ready, the table beckons...
Paul puts one objective under front right building in below pic, and the other diagonally opposite, just outside the village perimeter, looking to spread my forces out as much as possible.
 |
| Deployment view from south looking north |
The objectives placed, I must deploy my forces, holding back one platoon, as an 'immediate ambush', which is more like a delayed deployment in this scenario. Not knowing where Paul would mass his attack I had to defend the entire perimeter to both sides, which stretched my forces to the max.
I placed barbed wire from pioneers covering approach to the exposed objective, and pioneers behind the wire. Grenadiers covered the other objective from two sides, and the scouts covered the back of the pioneers. Guns and mortars were scattered about pointing in all directions covering, to a modest degree, all approaches. Tigers were immediate ambush, once I saw where the Shermans would approach from...
 |
| Deployment view from north looking south |
Paul decided to deploy in such away it appeared his attack was coming in on both objectives from both sides... so I couldn't turn any platoon to face any strong threat as the threat was all round.
Being British Infantry on the attack, Paul again pulled night attack.
For the first two turns all went more or less quietly, as Paul approached and neither side had any fire due to cover or darkness, poor visibility at range and gone to ground troops.
 |
| Initial approaches from the north... |

 |
| ... and south... |
Paul got three engineer teams up to my wire line, with a view to clearing it. Rather than let them achieve this I sent a flamethrower after two of them and shot the rest of the platoon at the third. All the engineers were killed at the wire, and this pinned the platoon down
Elsewhere, it was time to open up on the approaching Brits... I got a good round of visibility rolls, all coming up 4 or more, and let rip with everything. I had previously moved an HMG, Infantry gun and a Pak38 to better firing positions and sent the Tigers to aid the scouts, as they were staring down a para platoon and commando. I scored a load of hits, as you can imagine for all the firing, as none of my platoons were pinned and almost all the HMGs were firing at full effect, plus the scouts with their assault rifles backed up by the Tigers and pak38s, unleashed a hail of steel into the darkness...
That was fair enough, but to contrast with Pauls saving throws from the previous game, his troops started dropping like flies this time... the centre thrust along the hill was cut down to half strength and pinned, the commando were almost destroyed, pinned but stuck around, other platoons took fire too, to lesser effect but most were pinned by the end of my shooting phase.
Although Paul passed morale for those the worst damaged, to rub salt in the wound, Paul then went on to fluff his subsequent unpinning rolls, meaning the troops would be stuck in same positions again to endure another round of fire!
Trying to mitigate some of this Paul fired a smoke barrage with his mortars. Also, those that now had wanted to advance with weight of numbers and couldn't, tried to dig in, and failed that too... it was a terrible round of dice rolling by Paul. However his troops now at least were gone to ground too, so would be a much harder target.
Since my Tigers had fired, this then opened them up to a long range shot from the Firefly with its semi indirect fire. He managed one hit which I just managed to save, Paul passed the firepower roll to bail the Tiger.
 |
| Smoke to lessen the German firing |
 |
| Shermans approach the eastern side of town |
More fire was spat out at the now gone to ground Brits with predictably lesser effects...
Paul now sensed he had to press on with the attack. This time he unpinned and went after the scouts leading with the remains of the commando and the supporting para platoon. Advancing with 2 flamethrower teams to kill and pin the defending scouts, Paul rolled a 1+2 for one team and a 2+2 for the second team. All missed! Neither of us could believe it!
Paul tried the assault anyway as he had little choice now, being committed, and was predictably thrown back by defensive fire...
At this point I probably would have called it, had I been Paul, but Paul has a strength of character when it comes to playing FoW, that he just keeps battling away, and certainly lives by the saying, "it aint over till the fat lady sings"...
 |
| The firefly burns... |
 |
| Shermans continue to pressure the eastern objective. |
 |
| Engineers and mortars approach the wire |
 |
| The remaining para platoon facing the scouts, the commando are gone |
 |
| Tanks get closer |
Paul continues, he has little to gain now by sitting still, as he'll either lose the game by time out default or get shot up. So his assault still tries to get in but are again thrown back...
However he does find a way into the town centre. The engineers and pioneers have been going at each other, and the engineers had some help from the mortars. Although the pioneers eventually broke and fled, the tigers had turned once again, covering the approach to the now exposed objective, so the engineers went through the town hoping to swing down on to the eastern objective to aid the Shermans.
 |
| Remaining engineers approach the town centre |

The engineers make it to the town centre, but at this point are effectively surrounded themselves, its too little too late. One of the Shermans is bailed by the panzerschrek and refuses to remount...
Finally after a regulation 2.5hrs play, and the situation Paul finds himself in, he calls it. I quite honestly applauded his tenacity.
But in the end the German defenders prevail, and maintain their escape route / resupply line...

I had lost the pioneers only, though came close to losing the small unattached HMG platoon, and my mortars who all passed morale tests. Since I started with 9 platoons, I score a 6-1 win.
Paul had only actually lost one platoon, the commando, though nearly all his remaining infantry were at or below half strength.
I think in this game it seemed like Paul was playing against me, and the dice...
We have decided to call the campaign at this point. We have proved over the campaign, that infantry can for the most part hold up against other infantry in a defensive situation, with a decent deployment and a little luck.
At this point, I am sure 'Monty' will call in another 'special' and carpet bomb the defenders here, much as he did against Caen ...
I am not sure what the final campaign VPs are, I did miserably in the early campaign games, but clawed some back in the last two games, and Paul spent 5pts at the mid point to tweak his force, so I am not sure where that puts us now...
Paul said we should just call the campaign a draw... I'd be happy to do this, though feel he still probably has more points than I do.
So whats next, well, we need some practice for the Panzerschrek doubles tournie coming up, in Palmy, and and after that its Call to Arms in Wello... so some practice no doubt needed for that too.
Plus we'd also like to try our hands at the Firestorm campaign...
I hope you have enjoyed reading of our exploits during the Breville Axis of Attack campaign.