Showing posts with label Fighting Withdrawal. Show all posts

Friday, 30 August 2013

Gepanzerte-Schule, Teil Zwei...

... OK, getting clever with google-translate ;-)

Armoured School - Part Two...

After my previous post where my German mechanised force, had a reasonably successful go at having a crack at some damned dug in Paras, who were trying to steal back a portion of the greater Reich... it was now time to see how the same force would now fare against an Armoured Company...

My plan with my Mechanised force in this example being for the most part to 'hang on'..., but to still hopefully project some force, to blunt the attacking platoons. Tanks are big nasty scary things when they are rumbling towards your troops, but infantry can survive a lot of attention being dug in and gone to ground, and any half decent volley from the panthers can blunt one of these armoured prongs. Combine that with heavy artillery fire from the Hummels, and its possible to knock out a platoon at a time with this double tag team...

This still leaves the heavy platoon stummels and mortars to deal with the lighter armoured vehicles and recce and even the 37mm cannon on the platoon command half tracks can be pressed into service against these lighter armoured vehicles.

Last time we had played, Paul had discussed using his Soviet Forward detachment, a nasty mix of Tanks, Assault breakthrough guns and an Infantry horde... but a last minute change of mind had Paul bring his Canuks... His Canadian Armoured squadron from Market Garden.

So, once again my force was:

CHQ; 2 x SMG/P'faust + P'Schrek & 3 x 251 Halftracks
Full CBT, w/ SMG/P'Faust, 37mm Cmd Halftrack, plus 3 x  251's
Full CBT, w/ SMG/P'Faust, 37mm Cmd Halftrack, plus 3 x  251's
Heavy Platoon; Cmd 251 + 2 x Stummel + 2 x 8cm armoured mortars w/ obs
Recce; 1 x 250/1 + 2 x 250/9 Halftracks
Panzers; 3 x Panther
Artillery; 3 x Hummels w/ PzIII obs.

Whilst Paul brought:


CHQ – 2x Sherman V’s and a Sherman ARV
2 Armoured Platoons, each with 2x Sherman V and 2x Fireflys (Fireflys w/ .50 cal AA MG’s)
4x M10 3”
2 Universal Carrier patrols, each with 3x carriers
Rifle Platoon with 2 Squads and 3x Ram Kangaroo APC’s w/ .50cal AA MG’s

The Canadians bring with them upgunned 17pdr Fireflies @ AT15, which scares my Panthers. They're Confident Veterans, and have 'Woodsman' and 'Mission Tactics', but don't get British Bulldog...

The one thing I like about them is its all kill-able stuff - nothing greater than front armour 6. So my Panthers, Hummels and even Stummels are capable of 'having some fun' against this force...

So my ideal match-ups are going to be Panthers and Hummels to kill the Shermans, and Stummels can try taking out UCs & M10s, my Recce and 37mm halftracks can also target the UCs... Armoured mortars are mostly for smoke or infantry killing... That's my very general approach here...

So on to the mission, the dice roll and we get... Cauldron... no ones favourite mission... neither of us are keen so we re-roll... Fighting Withdrawal... not my favourite but it often comes up in tournies, and is good in that it has a finite conclusion fixed at 8 turns. Also there's no messing about with reserves... but the defender has to deal with Strategic Withdrawals...

On to deployment; I pick the side with the most general cover yet also decent LOS for shooting up Pauls tanks as he comes towards me.

I deploy a GPG on each flank objective, with halftracks also deployed, as I want them to shoot up Pauls infantry if they advance on me, and I want the 37mms available too. Hummels are central, recce behind small wood to my centre right, and heavy platoon with the mortars with the hummels, and stummels with the recce. Panthers... surprise surprise, are the ambush...

Paul decided to apply 'duckbills' to his tanks, giving them widetracks but also making them slow. He then deployed a Sherman platoon in his central and right flank woods. M10s and recce were in and beside the town, and infantry behind right flank woods. His 2ic Sherman was alone far on his left flank...

Deployment pic: sorry I couldnt find usual camera so these are crappy Ipod pics...


I moved my Recce across towards my centre sensing the bulk of Pauls attack to happen towards my centre and left. Paul pushed up his recce, fanning out towards my centre and left obviously looking to push back my Panther ambush... but as the bulk of my force was concealed at range and gone to ground he had no shooting...

My turn, and now the 'phoney war' begins...

Panther ambush... where to place it... I was sorely tempted to put it down on my right flank, knock out Pauls 2ic Sherman, and then to start rolling the flank, but was concerned at the distance my Panthers would then have to travel to get back into the action which was the mainly on the other side of the board... So instead I decided to place it where his recce had not been effective, my extreme left... I could pop it within 16" of Pauls right flank Sherman platoon... The hummels could also see this platoon and could get 4 tanks under the template and catch 2 infantry teams...

Recce would shoot up the UCs, Stummels moved to shoot up the m10s, Mortars would drop smoke on the centre Sherman platoon...

Smoke first, hit, great, that reduces their effectiveness, only one Sherman can still see the right side of board.

Panthers... 6 shots needing a 5, nothing... Hummels, three chances to range in on a 5, nothing... stummels 3 shots on a 6, nothing... recce shoot up the recce who failed to disengage, but I still could achieve little... and this appeared to set the tone for my shooting for most of the game, I couldn't hit a barn door...


Paul now started to gradually apply pressure... he returned fire at the Panthers but he too missed, or the one hit I got I saved. But I lost 2 hummels in the centre as Paul started to find his dice rhythm and the sixes started to tumble across the felt... I even suffered the ignominy of  that 1 in 36 chance kill; a UC vehicle MG hit the side of my recce command half track, I rolled a 1 for a save and Paul a 6 to kill it... mutter mutter mutter...

For the next several turns things continued this way, the Panthers and Sherman platoon exchanging foul language but that was about all... I withdrew my lone hummel into cover to try and preserve it. Paul decided to try a bold thrust with a lone m10 through towards the panthers flank but missed. The m10 being subsequently caught in a cross fire from a 'faust, 'shreck, and 37mm... the 37mm claiming the scalp and my first kill of the game...


Time came to withdraw my first platoon, and I had picked up a sneaky tip from seeing other German players; kampfgrupping a lone infantry stand with my 2ic, so these two teams quit the field leaving me still quite well positioned, no gaps yet...

By this time, Paul had started snaking his 2 UC patrols to my right to threaten that end objective, teaming up with the 2ic Sherman and other shermans who had started to edge out from the centre woods.

I had got a little bold previously with my right flank infantry... sensing a possible assault against a UC patrol, as it took a load of fire, if I could simply get 3 bails and or a kill here or there, they would be easy meat... one thing to remember for beginning players, if all the tanks you are assaulting are bailed out, then there is no tank terror test and no defensive fire. I thought I saw a chance but it wasn't to be, I bailed only two of the three UCs and then failed tank terror. I had now scampered infantry out of their foxholes so they were ripe for MGing, which Paul duly started... and teams started falling on my right...

Paul also knocked out 2 Panthers on my left over the next couple of turns, for the loss of a further m10..., the rot had set in and I was starting to crumble... The centre recce took another hit and the remaining 2cm halftrack quite the field...

The hummels were withdrawn next... making the centre looking more vulnerable too. So I managed to get my CO across from my left to the centre farmhouse, to keep the centre objective covered. The sensation of 'hanging on by ones fingers nails' had certainly commenced.

The stummels and Pltn Cmd were sent to reinforce the crumbling right ... the air was sporadically turning blue, as I continued to fail to be able to kill anything, and then kept failing infantry saves...

However, the one thing my dice were doing, despite letting me steadily die, was that I kept passing 4+ platoon morale checks, and the Panthers had hung on for quite some time with some decent armour saves, although as previously noted, had eventually been reduced to one tank... under weight of fire...

I hung on just long enough on my right, contesting with the Stummels, to whip that objective away... Paul started pressuring the left flank, now that I was down to 1 Panther, and since the centre was looking thin I had had to start moving the left side Grens over to the centre, everything was getting perilously thin... Paul also pushed up on the centre too, with Shermans and m10s..

Another platoon, had to be withdrawn, and I withdrew the shattered remnant of my right flank infantry, passing a skill test to do so... Sensing it was getting close to the point that all I had to do was stay alive, I backed my last panther off into the woods to keep it out of LOS and alive.

Paul now realised it was now or never... too late to grab the left objective, this got pulled too... so it boiled down to could he kill enough of my teams/platoons that were remaining, to force me to take a company morale check and quit the field.

Paul massed all the fire he could; sent 4 tanks into the wood to kill the last panther, positioned enough tanks to shoot up the remnants of the heavy platoon... and tried to get some shots on my CO in the farmhouse...

One Firefly got a hit on the Panther, but only bailed it, and I passed morale! I lost two more heavy platoon vehicles, but they passed morale... and shooting at the CO was ineffective... and that was it... game over, I had hung on, with a final score of 5-2, as I had lost the halftrack recce platoon mid game, to give Paul a point for his efforts.

A win, but it really didn't feel like it, and was another of those pressure cooker games, that has one pondering... and I do this for fun!?...

I had managed to destroy 2 m10s and 2 UCs and that was it. I had lost 2 hummels, 2 panthers, the 3 recce halftracks, an armoured mortar, stummel and their pltn cmd, and several infantry teams. My efforts felt rather pathetic. If I had managed at least a little better dice earlier and some effective co-ordination between the panthers and hummels, reducing Pauls Sherman platoons, I could have put him on the back foot... but it wasn't to be and thus a slow grinding capitulation ensues, that was quite literally saved by the bell and some lucky platoon morale checks...

A tough game for Paul to lose, be he continued to keep the pressure on throughout, and was so close to victory at several times.

Despite failing to kill much, I think my troops performed, or at least had the potential to perform, adequately, had I managed to hit some targets,... so I feel its has rather proved the point that this overall force has the potential to be effective in a 'take on all comers' tournament...


Tuesday, 13 August 2013

CTA 2013 - Mechanised Mayhem and Misadventure - Game 5 - Fighting Withdrawal - "What might have been..."

So day two had got under way in a positive fashion, with a few more points on the board, though I am under no illusions at this point,  I am probably in serious contention for the wooden spoon ...

My final game of the weekend was a 'blue on blue' encounter drawn against John Murrie, a fellow blogger of Stumpy Heaven fame. John was running a Fallshirmjäger Company.

Johns force was...

Fallschirmjägerkompanie
Fallschirmjägerkompanie HQ 120
Add Panzerfaust SMG
Add Sniper
Fallschirmjäger Platoon - 3 Squads 265
Add Panzerfaust SMG
Fallschirmjäger Platoon - 3 Squads 265
Add Panzerfaust SMG
Heavy Tank Platoon - 2 Tiger IE 430
Fallschirmjäger Tank-Hunter Platoon - 4 StuG G 440
Rocket Launcher Battery - 3 15cm NW41 125
Fallschirmjäger Anti-aircraft Gun Platoon - 3 2cm Flak38 gun 105

The final mission of the day was Fighting Withdrawal, and as I have said in the past, its always a mission I have stuffed up, whether attacking or defending. I invariably bollox up the key timing of the late stages of the game...

A glance at Johns force and I thought I was up against an armoured force, seeing the Tigers and Stugs, but John corrected me his was an Infantry company so my Mechanised would be the attacker.

John, being the defender, chose a side to defend and put down his objective marker, at back of the woods by the river. To spread out his forces I placed my two; one centrally, the other to my far right.

The key difference in this mission being the fact that generally the defenders objective will be placed slightly further back than the attackers two, so the attackers ones are thus fractionally closer and thus seem easier to go for, but these last two are also the ones that the defender can withdraw towards to the end of the game.

When I have attacked this mission in the past I have usually gone all out for my end placed objective, only to have it whipped from under feet as I am about to capture it...

So this time I decided to go full steam ahead for Johns objective, meaning I would have a full 8 turns to try and capture it. Shit or bust as they say!

John had deployed an infantry platoon defending each objective, with Stugs also covering my right side objective, and his AA guns covering the other two, with Tigers in ambush.

I loaded my left side, looking for a quick approach, covered by the recce advance to push back any ambush, then stormtrooper out ready for the assault. Tanks would move up in support to deal with the Tigers where ever they showed up. The Paks I placed centrally, their job being to move up and stop the Stugs having an easy journey across the board, to reinforce the main objective. The Nebs concealed themselves in the corn.

We're ready to rock and roll...


Immediately the Pumas pushed forward in to the village, with their recce move, and regular move, getting into good position to push back the Tiger Ambush, and all able to lift GTG on the AA guns and a viable position to stop Johns central FJ moving across easily to reinforce the main objective I was going for...

The two GPGs also moved up into the villages either side of the river. Paks advanced through the corn heading for the small tree line to take shots at the StuGs as they would inevitably have to cross the board to reinforce the threatened objective...

The KTs moved up to support, and some lucky fire knocked out the AA gun in front of them. More fire knocked out the AA gun in the open.

In Johns turn he started withdrawing the AA guns to preserve the platoon. A sniper popped up and started taking pot shots at the Pak40 crews, whilst the Tigers also made their presence known appearing in the back of the woods behind the objective.

The StuGs started their move towards the far objective but were wary of the Paks...

My turn two and things started to hot up, both GPG advanced MGing the FJ infantry in the wood to little effect and the GPG infantry storm troopered out of their half tracks. The central GPG getting right in Johns face in the tree line, and flank GPG infantry getting part way across the river... in my mind I was playing this as a stream, though later the vulnerability of troops crossing a river was exposed. The Paks continued their progress to the tree line and the KTs started moving to try and get in a position to either face off against the Tigers or StuGs...

At this point it all looked pretty good, with Johns single FJ platoon looking surrounded and cut off, other than for the Tiger support.

I am going to start generalizing, as its now ~6 days since the game, and I have not got a pictorial reference to prompt me further...

In Johns turn, feeling the pressure of the impending attack, he withdrew the FJ further into the wood... which I was a little surprised at, as he had given up his Gone to Ground status and bullet proof cover, and the half tracks would be able to swarm his position from all sides. However, a crucial hit on my troops was a strike on the central Grens in the tree line from Johns nebs, which after some crap saves, killed three teams and pinned them down.

The Paks and Stugs were busy trading shots on the other flank with the sniper still trying his hand against the Paks too.

My turn 3, and it was all on, or would have been had the central Grens unpinned, which they did not despite a CO reroll. However sensing a real chance to close out the FJ this turn I lined everything up, the flank Grens moved up to get into assault positions and the haltracks all advanced to shoot up the FJ in the woods since they had lost their foxholes by moving, even the neb observor could see a target there.

Seeing a big blob of FJ infantry under my neb template I fired that first, getting a hit and scoring several kills... but crafty John removed teams from the perimeter, the ones that the surrounding half tracks could only just see into the woods, thus robbing me of those extra potential kills, curses! Perhaps I should have fired the half tracks first...

No matter, this pinned the FJ, and the concealment of the woods would hopefully mean defensive fire would be minimal, except of course for the Tigers... and I needed a tank terror test too... passed! Defensive firing caused some damage but the assault still went in...

The panzerfausts hit both the Tigers, yay! But both only suffered bailed results! Boo! Not the best but, they were out of the fight and if I could force the FJ to break off they'd be captured and destroyed.

The fight went down to the wire, with a few typically missed crucial hits. Eventually the Grens were sadly beaten off, but the FJ were down to two teams, one of which was their CO. Mine had gone down with the fight, but I still had VonSauken (VS) around for morale.

A gripping turn, but John held on by the skin of his teeth.

The worst bit for me though was Johns following turn seeing both Tigers remount (groan)... I was still in with a shout though, I still had half a GPG ready to attack again with VS, once they unpinned,... the Paks were holding off the Stugs and my KTs were still looking to get towards the Tigers and deal with them...

John continued a holding action, managing his Tigers well...but the Stugs were now in a crossfire from the Paks and KTs...

My next turn would hopefully see it to conclusion, but the central Grens again failed to motivate, despite the reroll from VS... Argh! I couldn't move to assault those two measly teams, who had by now dug in again... and so my MG fire at them was of little effect...

I had thrown just about everything forward by now, half tracks, pumas, the works, trying desperately to kill those last two teams but they just wouldn't die or run away... and steadily John was knocking out these light vehicles with Tigers, Stugs and other fire...

Eventually my last Grens unpin and make it forward, but they still cannot close out the deal and are themselves beaten off again... I cant believe it! In desperation, and time running short, I assault through the woods with the King Tigers, its all I have left to do the job... they pass their bog checks, make it through the defensive fire of the panzerfausts, and then miss their attacks! Argh! I only needed to roll two 3+'s and they would have killed the last remaining infantry here, and I probably would have hung on afterwards in the Tiger vs King Tiger duel on the objective... John passed tank terror with his FJ, assaulted the KTs and destroyed one and bailed the other... and that was it... boo hoo!

I'd tried everything and pushed relentlessly, to no avail. I couldn't even kill off a platoon, John skillfully withdrew damaged platoons at key times. The AA guns to start. Three blazing Stugs and another bailed, that last bugger still got away from me... net result for all this carnage? 1-6 against...

Johns excellent report of the game can be viewed here. Always interesting to see it from your opponents perspective.

I was left again clutching at thin air... and shaking my head at what might have been,... should have been... and left pondering the ifs, buts and maybes...

My Grens suffering from the nebs strike, and then not unpinning for 2 turns... the Tigers only suffering bailed results from the panzerfausts... bugger bugger bugger!

It wasnt until after the game I realised I had completely ignored the centre objective, maybe I could have pressured that too? At least my close proximity to it,  was keeping the FJ platoon there tied up defending it.

So I claim another single point for a game, bringing my 5 game total up to 9 points, out of a possible 30... I didn't even break double figures...

Still, this last game against John was a real exciting nail biter, and I really felt I was always in with a chance... and for that reason despite losing it 1-6, I scored it my favorite game of the weekend and thus gave John, my 'sportsmanship' vote... a little unusual in a game you lose, these things normally go against the folks in the games you win, and I thought about giving it to Russell in my first game, but despite getting better points in that game, I felt I'd had a more proactive and thus enjoyable final game, so scored it that way.

My final standing in the tournament? Of 20 players I came equal 18th, tied with John Hutton who only played 4 games...

The weekend was its usual heady mix of gaming emotion, punctuated by the roller coaster ride the dice rolls give you... one minute you're up, the next, down... such is the game...  funnily enough, on chatting about how we felt about the gaming weekend beforehand, I mentioned that the best way I can describe how I feel about these events, is akin to exam nerves during my university days... and yet I still do this for fun! Of course, Paul quipped, "...yeah, and some people cut themselves with razorblades for fun too..." Does that put it into perspective, I dunno... not that I'd I recommend the "razorblade hobby"! ;-)

But no doubt I'll be back again next year, for another dose of humility!

I'll offer some post-tournament thoughts in a subsequent post.

Thanks for reading, hope you found the reports interesting, and sorry again for the lack of pictures - it seems not taking many, didn't help my performance much!

Thanks again to Paul for the lift to the event each day, much appreciated and it gives someone to vent your frustrations to after the event!

And of course, thanks again to John H for running the show.


Saturday, 25 May 2013

Breville Campaign - The defence of Breville - Fighting Withdrawal

Since starting the Breville Axis of Attack campaign, the British paras, under Paul's skilled hand, have done all expected of them, landing in a glider borne assault to capture the Orne bridges, resisted repeated attempts by the Germans to break through their lines, and then gone on the offense, beating the Germans back out of Bois du Mont, their fighting withdrawal there becoming a rout.

The Paras push on to capture their last objective, the town of Breville itself, and close out the campaign...

The Germans have one last chance to salvage a small amount of pride, before the end... And this time their Commanding Officer has been given a rapid schooling in the art of holding ground with Infantry...

 Having won the last battle and the dice off for the next game to choose the mission, Paul has pushed me back to Breville, and has decided on a Fighting Withdrawal to try and seal the fate of the Germans. Paul set the board up and I came along with 1750pts of Grenadiers, against Paul's British paras...

The German Force

Pauls forces, IIRC...

British Airborne
HQ: CO + 2iC + 2x PIAT
Full Paras platoon
Full Paras platoon
Full Paras platoon
Para Engineers platoon
Commando Section
2 x 6pdrs
3 x DD Shermans + 1x Firefly (Confident Trained)
4 x Mortars

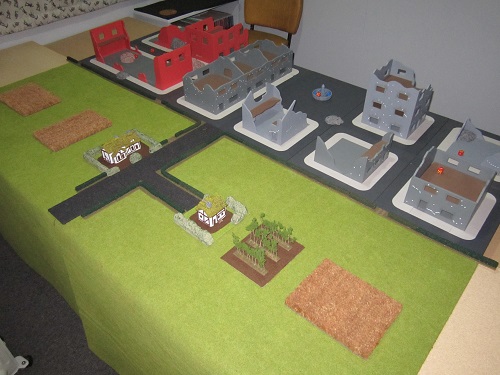
With insufficient buildings to create the right look, Paul instead took a different approach to setting up the town, and went for a full ruined town edge look, using the 'Stalingrad' building set he made!

Paul managed to bring these two sides of the boards into alignment raising one section on a slightly raised platform. Very clever I thought!

The outskirts of Breville
Having learned how not to defend with infantry in the last game, I took Paul's advice, and this time set up a high perimeter line on the edge of my deployment zone. The three objectives were spread across my zone with typically, the defenders one in the centre and the attackers two to the two flanks.

The pioneers covered my exposed right side of the board, behind their barbed wire, and backed up by 2 infantry guns and 2 HMGs. In the centre a grenadier platoon with attached HMG and P'schrek team, and backed up by my scouts with assault rifles. On my left another Grenadier platoon with attached HMG, backed up by 3 Pak38s. My 2 mortars were centre back holding centre objective . The 5 PzIVs were in ambush...

Pioneers defend the German right flank

Paul decided to mass his main attack on his right, not wanting to have to deal with my wire... which was more or less as I expected. So I added my 2ic and CO to the end flank building.


Paras, commandos and Shermans backed by mortars ready their assault under cover of darkness

Looking down the German line from their left flank

Paul pulled night attack and with it the British spearhead move. My high line of defence did impede this move, slightly. Undaunted Paul pressed on with his attack getting into it quickly with Commandos and Paras, looking to make some holes with flamethrowers...

The panzers reveal their ambush from behind the left flank end buildings and drive up ready to hose the attacking infantry...

Initial attack, 2 flamethrowers are expended for the loss of a single German team

The bold move by the commandos flamethrower is rewarded by a hail of return fire which guts the commandos and they break and flee. Still undaunted Paul readies his assault with careful precision and manages to breach my line...

Paul gets excited with the casualty markers... there weren't quite that many deaths here , yet...

Its all on like donkey kong! I have lost the end grenadiers, 2iC and a panzer to Paul's assaults, but my Co has fallen back out of harms way. All this time my scouts have been rushing across from the centre, as have the 2 HMGs from the opposite flank, trying to help reinforce my faltering left... But Paul still has the pak38s and panzers to deal with...


Its all on big time!

A surge by Brits, and everything fires trying to knock out the pak38s and panzers to little effect! But the assault still goes in capturing the end flank building and forcing me to pull back the guns and tanks slightly....


Paras capture the end building, but objective is still strongly contested.
Pak38s and panzers return fire at the Shermans killing two and bailing the other 2 but they pass morale!

Now comes the craziness, with nothing to lose, a real do or die, Paul emerges from the building, and with a combination of fire, destroys a Pak38, bails a panzer with a Piat, and assaults the remaining panzers, staring down 12 dice of def fire on 4s. I push him back just... 3 dice are 4s, 2 are cocked, I roll these again, one 4 the other cocked again... I can't bare the tension! I roll the last dice again, a 4! And he is pushed back!

Paul then throws caution to the wind and has the 2iC join the 2 remaining Piats from a gutted para platoon and assaults with these! 12 def fire dice again... I pick my dice back up counting as I do and suddenly realise I had thrown 13 dice previously! What to to do? Paul resets his main para platoon again , "thrown em again Scott!" Eek! I do but get 5+ definite hits pinning back the main thrust. So Paul still tries with the 2 Piats. 12 dice again and again they are thrown back. But Paul's is rolling saves like a god again and few if any of the paras fall to the def fire.

Day light had also broken at start of turn 3...

In my turn I think, right, hose the lot of them down and that will be the end of it. I fire everything that I can. But Paul keeps rolling so many saves. Only the engineers are finally stopped , reduced to three teams and the Pltn Cmd dead, they cannot advance. But the main paras still pressuring my panzers refused to die.

To make matters worse the Shermans remount and let my Panzers have it! Paul lines up everything shooting all he can to get pins and or destroy teams in the crucial area. He's done all he can and assaults once more.

Defensive fire from the remaining Pak, Scouts, CO and lone observer spit out just enough fire to throw back Pauls assault.


Paul gets ready for his crazy assaults!

Its now almost midnight, we've played for over 4 hours and although contesting the flank objective, I am now in a position after some 5 turns to be able to pull this flank objective out from under Paul. Even if he does get it next turn, it will then vaporise and he will be in no position really to push for the other objectives in any sensible time frame, and I have enough platoons remaining such that he is unlikely to break me, and I still have my CO alive, for a change!

So Pauls calls it. The Germans have held on for their first win of the campaign, and as they started with 9 platoons and only lost two (Grenadiers and Panzers), claim a 5-2 win.

Final positions
To say this was a nail biter is not the word! This mission is always a real sod, especially for the defender as you always feel you are hanging on for grim death. So I am thrilled to have come away with a win, especially over Pauls Paras after the gutting I got last week against them. And I have to say most of that comes from Paul giving me some idea of how to set up and run a defence with infantry.

He may be wishing he hadn't told me now???

So I claw back some VPs for the campaign and post game dice rolls show Paul still has the initiative to try and attack again. He chooses to try Surrounded for the next game...

Friday, 18 January 2013

Battle report; Fighting Withdrawal, Germans vs Soviets, 1200pts

After our last game at Paul's gaming pad, playing 1200pts, and Hold the Line, we decided to have another go at this points level, with another mission, to see if the points value would be robust enough to give the right feel for the game still and come to a playable conclusion within an evening, albeit a friday night, so we can risk staying up a little later than usual ;-)

I hosted the game, and set up the terrain. Thinking Paul would be sticking with his Para's, I set up a European themed countryside. I decided to stick with my favourite, the Panzergrenadiers of Panzer Lehr. German infantry platoons are rarely large, yet Lehr has a few extra Tank hunter teams and throw in the HQ attachments, you can make a reasonable size platoon with which to make an attack, or defend.

So I took:
German, Lehr Gepanzerte Panzergrenadiers 1200pts
HQ P/fausts + 2 PzShreks
Full GPG
Full GPG
Heavy Mortar Platoon (4 tubes)
2 Jagdpanzers
3 Pumas

So I'd have two combat platoons one of which could be the main attack with one supporting. The heavy mortars could bombard, pin and hopefully kill some stuff with their high 3+ FP. The Jadpanzers would be there to run interference through the centre. I do rather like the low silhouette of the Jagdpanzer (and StuG) because with realistically scaled terrain, the Jagpanzer panzer can often claim a cover bonus, behind a low hedge, where a larger turreted tank, could not. The recce Pumas could have a multi-purpose role, pushing back ambushes, lifting GTG, shooting stuff up and even assaulting if the chance arose.

So that was the plan.

Paul rocked on up, unzipped his bag, and brought out his Soviets! I hadn't planned for that! Oh heck... I hate playing Soviets,... theres always millions of the little buggers to kill and they invariably never run away because they're usually fearless...

Not only that, Paul had picked a 'Forward Detachment', from Red Bear. This is a mixed formation which combines armour and infantry in its HQ and combat platoons. Oh, and its also "always attack"...

So that puts me on the defensive, which I hadn't expected.

So Paul took (IIRC):
Soviet, Forward Detachment 1200pts
Infantry based HQ
1 x Infantry Combat platoon (15 elements with Kommissar)
1 x Tank Platoon (6 x T34/85)
1 x Assault gun platoon (4 x Su122's)
Medium Mortar platoon (6 tubes)
Small Infantry scout platoon.

 So the scene was set. The remnants of Panzer Lehr Division have been rushed to the Eastern front to try and stem the tide of the Russian onslaught. The weight of force the Russians are exerting in this sector and all along the front is extreme, forcing the Wehrmacht division into a Fighting Withdrawal to the next defensive line. Can they retire in good order, preserving their forces, whilst giving the Soviets a bloody nose for their troubles...

In Fighting Withdrawal, the defender chooses a side to defend and places one objective marker in their deployment zone. The attacker then deploys two more objective markers on the defenders side of the table. So the defender has to spread his force to defend 3 objectives. At this same time he must withdraw his platoons from the table, in good order, in a set fashion as precribed by the turn sequence, but also may start to pull from the table, the objective markers placed by the attacker.

It invariably turns into a tension filled, mind bender of a game, especially for the defender, who is trying to hang on to the objectives with a strung out force, and being forced over time to take his battered troops off the table too!

So I surveyed the terrain, and decided my best line of defence was probably going to be the streetline of buildings, and I would place my main objective, centrally behind these, knowing Paul would be likely to place his 2 more objectives either side of this as far apart as possible. And this duely occurred.

Knowing I had to defend 3 objectives I decided to make a kampfgruppe with my 2iC, pulling elements from the other two combat platoons, who themselves would be reinforced from the P/shrek teams from the HQ...

So thats what I did. I then placed the mortars in a position, to bombard the table, and placed my jagdpanzers centrally either side of the central wood, so they could respond to a thrust from Paul, on either flank. The Pumas I held as my ambush. I figured their 9 shots, would be better than the 4 from the jagdpanzers... My half tracks I decided to deploy on the table but concealed in woods behind each platoon, so if a mob of soviet infantry appeared, they could drive up and mow them down with MG fire...

Heres how deployement went...


Paul predictably went for the exposed objective on my right flank, amassing his greatest strength on that side, his main Infantry platoon and SU122's. His mortars and scouts were next to these and his T34's were centrally placed to stop my other platoons from getting twitchy and heading over to the flank to help...


Pauls T34/85's... 6 of these buggers in a 1200pt game, I am always amazed how much gear the soviets get!


And his 4 Su122s... and aganst this I manage 2 assault guns and few snazzy armoured cars... sheesh! Below the main soviet assault force. I have been on the receiving end of the SU122's before... once they get within close range its all over for your infantry, rerolling hits with volley fire, and no infantry save and a 2+FP to blow you out of your foxhole... not nice. These have become public enemy No.1 for my Wehrmacht...


And what do I have defending against this juggernaut?...these few humble souls, backed up by the CO....


Meanwhile my centre sits quite contentedly, feeling reasonably secure in the buildings, gardens and foxholes. His armour would have a tough time getting through here... but I dare nor move it too much to weaken protection of the 2 objectives they are covering...


First turn, Paul moves out, his T34s swinging towards his left...


... and a general advance on his left flank... scouts revealed GTG, but nothing died on the German side...


On my turn I hurriedly started moving my jadgpanzers across to my right...


...and of course I had decided to strike with my ambush while the iron is hot, and deployed my 3 ambushing puma's in the tiny tree line...


From my left flank I nervously started advancing half tracks across out of the woods, just in case they needed to mount up and make a dash along the central road, to reach the opposite flank...


The puma's let rip and destroy two of the Su122s! The heavy mortars range in on one of the SUs and kill 3 infantry teams...


In Paul's subsequent turn he gets his T34s and Su122s in to a position to shoot and destroys the daring pumas! Mortar fire kills an infantry team too, pinning them.


The other T34s MG fire at the flank grenadiers who had started moving, and kill one of them and pin the platoon...

In my turn, my jagdpanzer fires on the SU122s but only manages to bail one....


Not much else happens till next turn.. Paul has swung his SU's into a better position and started advancing his infantry, but they take more mortar fire and the jadgpanzer pops one of them!


...the other jagdpanzers nails a T34...( please note that is smoke and flames billowing from the back of the tank, and not a jet engine - these wouldn't be fitted to tank till the M1A1 Abrams ;-p )


The action really starts to hot up on the flank, with the soviets pushing their advance and the germans hanging on...


Assorted assaults , mortar fire and MG fire fire rakes back and forth from both sides over this area, the screams of the dying filling the air, the bloody mess of their bodies, smearing the countryside...


In the mean time, Pauls Mortar observor had sneaked forward on the other flank. I saw a chance and advanced a team to assault him, but actually killed him with fire as I advanced!...


... so the German infantry team dodged back into cover...


Eventually, the russian advance is telling and they finally get into a position to fully contest the objective, and capture the last remaining bailed Jagdpanzer that had moved across to the objective, only to get nailed by a T34 and bailed. The other jadgpanzer had already succomed to T34 fire... All I had left contesting this objective was my CO!


I get in to a position to fire on the soviets clustering around the objective, and allowing my CO to expedite his escape via half track transport...


Top of turn 6, I pull the objective out from under the soviets...The half tracks MG fire hurts more of the soviet infantry, leaving only one left... backed by their CO.


The German CO legs it into the woods behind him, as the last soviet infantry team is neutralised!


The german CO finds discretion the better part of valor, and hides in the woods...


 Paul's harsh realisation is that, by this time, the soviet forces are not in a position now to pressure the other objectives, even though I have had to withdraw my left flank grenadier platoon, and the final remnant, one halftrack from the right flank grenadier team. His only option now is to try and break my company.

I have withdrawn 2 platoons, had 2 destroyed, and have 2 left on the board. If Paul can kill one more platoon he can force a company morale check. Over the last two turns Paul puts everything into killing my mortar platoon, who have realised the situtaion and stopped firing , and gone to ground.

Paul manages to kill 2 teams on turn 7 but can't kill any more on turn 8...


With that, I am able to claim victory...withdrawing the shattered remnants of my forces, and securing a 4-3 win!


The final positions...


It has to be said the action on the Grman right flank over the objective was brutal, and I passed a great many platoon morale tests, much to Pauls frustration. "Die damn you!" being his echoing cry round the room. It has to be said his soviet infantry also survived  few!

A great game, full of tension and drama. I must thank Paul for keeping me right with the impliactions of the turn sequence of this mission as I could have cocked things up at the end, without his helpful advice.

Looking forward to more!